JavaScript
-
Linting
- Airbnb style guide, Google style guide, Standard Style
- Linters are tools that scan code with a set of style rules and report errors
they find
- Readability
- Pre-code review
- Finding (syntax) errors before execution
- Use custom ruleset to make custom ESLint plugins for different framework, libraries, or companies (eslint-plugin-react, eslint-plugin-vue, or eslint-contrib-airbnb,…)
- Most common is eslint
- Prettier for formatting and linters for catching bugs
- Best practice: Don’t skip the regular local install. Editor plugins (VSCode) will pick up local version of Prettier
-
Project set-up
- package.json stores project dependencies and important config settings for the project
- npm install <pkg> —save-dev saves the package as a dependency for development usage only
-
Organizing JavaScript project
- JS is flexible → hard to maintain if code is unorganized → design patterns
- Common patterns
- Plain Old JavaScript Objects and Object Constructors
- Factory Functions and the Module Pattern
- Classes
- ES6 Modules
-
The JavaScript language
- JS is organized into three main pillars: scopes/closures, prototypes/objects, and types/coercion
- Code structure paradigms
- Procedural
- Top-down, linear progression through a predetermined set of operations, collected together in related units called procedures
- Object-oriented
- Collects logic and data together in units called classes
- Functional
- Collects code into functions (pure computations vs. procedures), and the adaptations of functions as values
- JS is multi-paradigm
- Procedural
- JS is backwards-compatible: there will be no future changes to cause currently valid JS to become invalid
- HTML/CSS is forwards-compatible: new additions to the language will not break even if run on older engines
- If JS is run on an older engine, it will either throw a syntax error if the feature is a new syntax, or throw a runtime exception if the feature is an API
- Transpiling (Babel.js): a tool to convert a program’s source code from one form to another. Babel.js convert newer JS syntax version to equivalent older syntax
- Best practice: use JS latest version → clean code and communication → let tools take care of producing forwards-compatible version of the code
- Polyfill (shim): provide a definition for the missing API method as if it is natively defined. Babel.js also does this
- Best practice: transpiling and polyfilling are effective in filling the gap between code with latest features and the old environments → Standard parts of every JS project’s production chain
- Interpreted/Scripted execution
- Parsing + Compilation + Execution

-
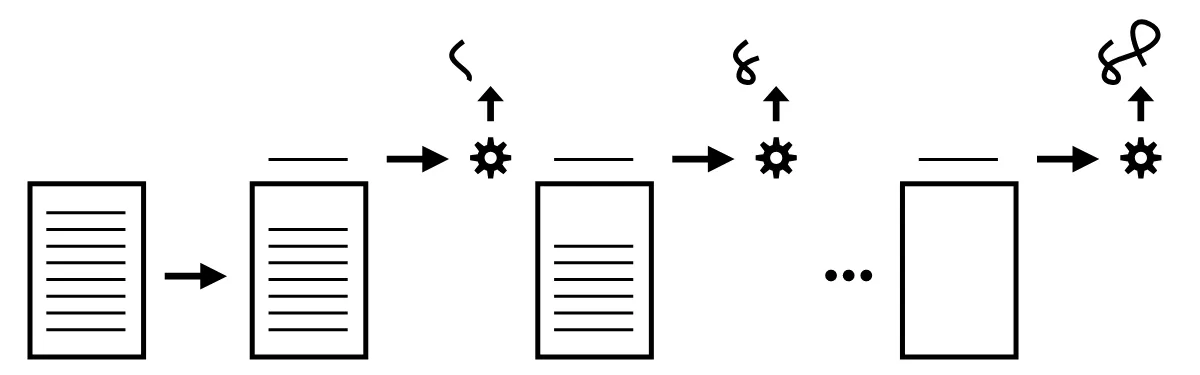
For JS (figure 2 above)
- After a program leaves the editor, it gets transpiled by Babel, then packed by Webpack (and other build processes), then gets delivered to a JS engine
- The JS engine parses the code to an AST
- The engine then converts that AST to a kind-of-byte code, a binary intermediate representation, that is refined/converted even further by the JIT compiler
- The JS VM executes the program
-
Web Assembly (WASM)
-
Strict mode: prevent early, more compile time than runtime, errors
-
Best practice: use strict mode for the entire program
- “use strict”; at the top of the file
- Virtually all transpiled code ends up in strict mode, even if the source isn’t
-
Surveying JS
-
Each standalone file is its own separate program
-
Best practice: Projects use build process tools that combine separate files into a single file to be delivered to a web page
-
The way multiple standalone .js files act as a single program is by sharing their state (and access to their public functionality) via the “global scope”
-
Since ES6, JS also supports file-based module format via module-loading mechanisms
-
import statemen
t
-
<script type=module>
-
-
-
Values
- JS values have two types
- Primitive
- strings
- numbers, bigint
- booleans
- null
- undefined
- Best to use this as the empty value
- symbol
- Object
- An unordered, keyed collection of any various values
- Functions and arrays are a special sub-type of object
- Access properties with dot or bracket notation
- Primitive
- Reserve “ for interpolated strings, otherwise use "" or ”
- Declare variables
- Variables declared inside functions are considered to be of the local scope, which is further divided into function scope and block scope
- var for function scope
- When declared inside a function, the variable can be accessed from only inside the function
- let and const for block scope
- When declared inside curly braces (if, switch, for, while), it is only accessible within those braces
- Best practice: use const only with primitive values to avoid confusion with re-assignment (not allowed) vs. mutation (allowed)
- JS values have two types
-
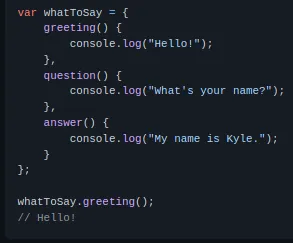
Functions - Since JS functions can be values, they can be wrapped in a single object/array
-
- Classes
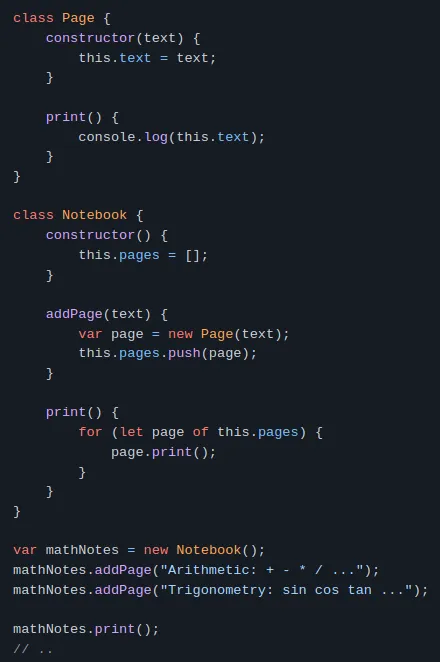
- What it really does
- Create a function named Page whose body is taken from the constructor method
- Store class methods, print() in Page.prototype
- Getters/setters
- get propName() → acts like a property → “virtual” property
- set propName() → acts like a property
- Inheritance

- Polymorphism
- Both inherited and overridden methods in different child classes of a common parent class can have the same name and co-exist
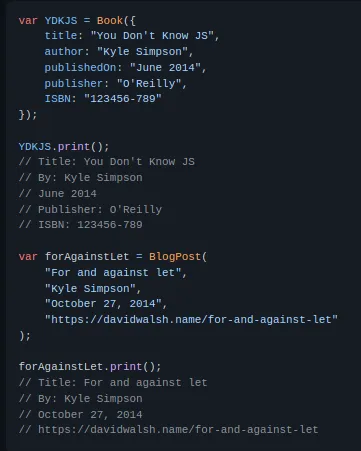
- Modules
- Classic modules - Key hallmarks of a classic module - An outer function that returns an “instance” of the module - One or more functions exposed that operate on the module instance’s internal (hidden) data - Module of this form is just a function, and calling it produces an instance of the module → “module factories” - Class properties → function-scoped arguments, public methods wrapped into a public API
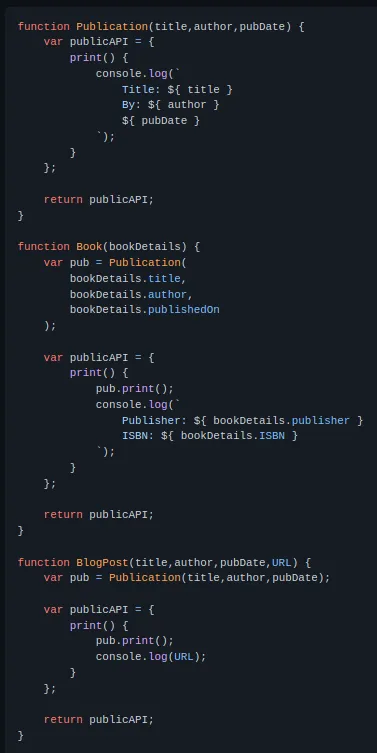
- Instantiation of module
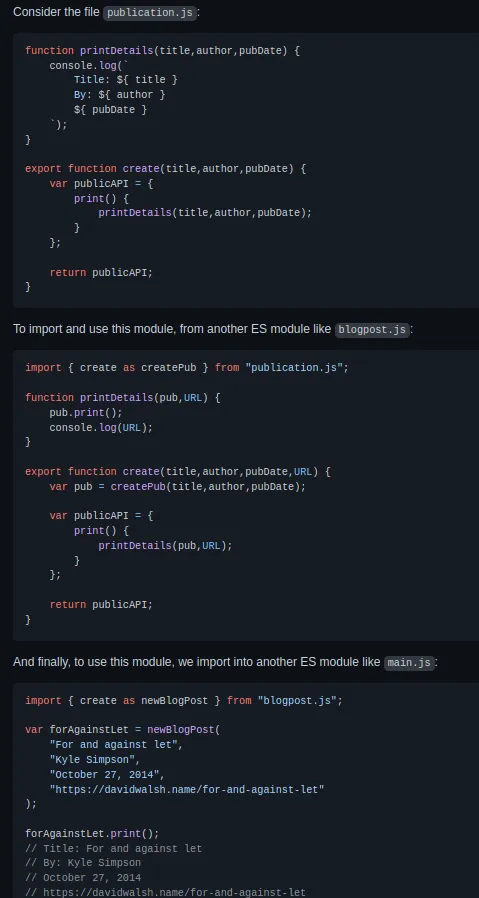
- ES6 modules
- There’s no wrapping function to define a module
- ESM’s wrapping context is the file
- One file, one module
- You don’t interact with a module’s API explicitly. Use export keyword to add
a variable or method to the module’s public API definition
- If something is defined in a module but not exported, it stays hidden
- You don’t instantiate an ES module. Use import keyword to use its single instance
- If module needs to support multiple instantiations, you have to provide a classic module-style factory function
- 2 types of export - Named export - Can named export multiple things - Default export - Can only default export one thing - Usually the class the file is based on
- There’s no wrapping function to define a module
- Digging to the roots of JS
- Iteration - The iterator pattern defines a data structure called an “iterator” - Has a reference to an underlying data source - Exposes a method next() - Has value and done properties - ES6 iteration
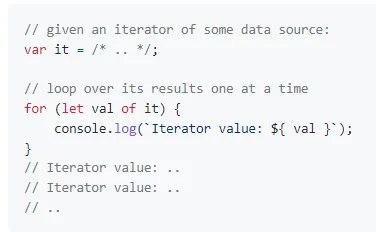
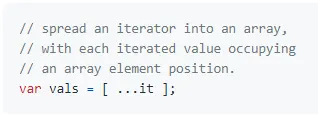
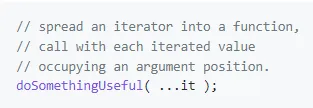
- The … operator
- spread - Both cases follow the iterator-consumption protocol (same as
for..of loop)
- Array spread
- spread - Both cases follow the iterator-consumption protocol (same as
for..of loop)
- Function call spread
- rest/gather
- Iterables
- Strings, arrays, maps, sets,…
- Most JS built-in iterables have three iterator forms available - keys() - values() - entries()
- Closure
- Closure is when a function remembers and continues to access variables from outside its scope, even when the function is executed in a different scope
- Common in asynchronous code, such as with callbacks

- this keyword
- Behaves differently from other programming languages
- Characteristic of function execution
- this-aware - and their dynamic context - allows for re-use of a single function with data from different objects
- Global context
- References the global object
- window object the web browser
- global object on Node.js
- Apply to both strict and non-strict modes
- References the global object
- Function context
| Non-strict | Strict | Note | |
|---|---|---|---|
| Simple function invocation | Global object | undefined | Function defined separately |
| Method invocation | The object that owns the method | Method of an object | |
| Constructor invocation | Using the new keyword to create a new object and set this to the newly created object | ||
| Indirect invocation | call() takes an object to use for setting the this reference for the function call | Use the call(..) method | |
| Arrow functions | The arrow function does not create its own execution context. The this is inherited from the outer function where the arrow function is defined |
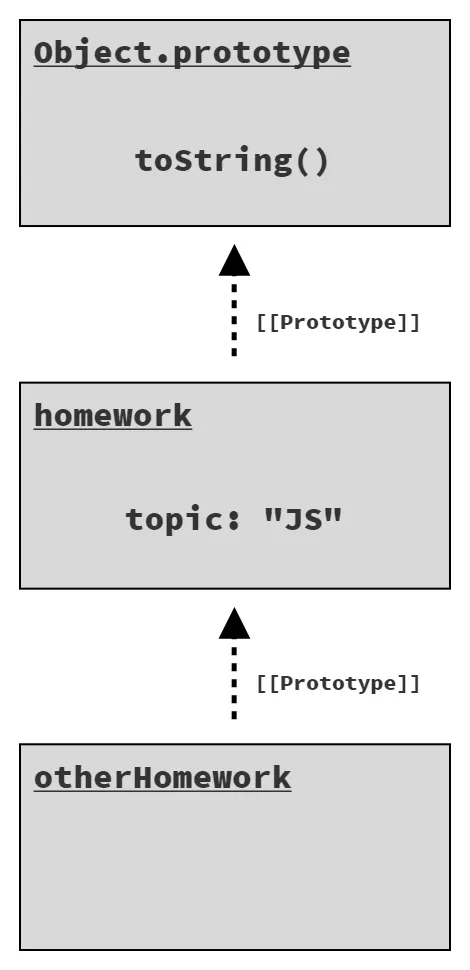
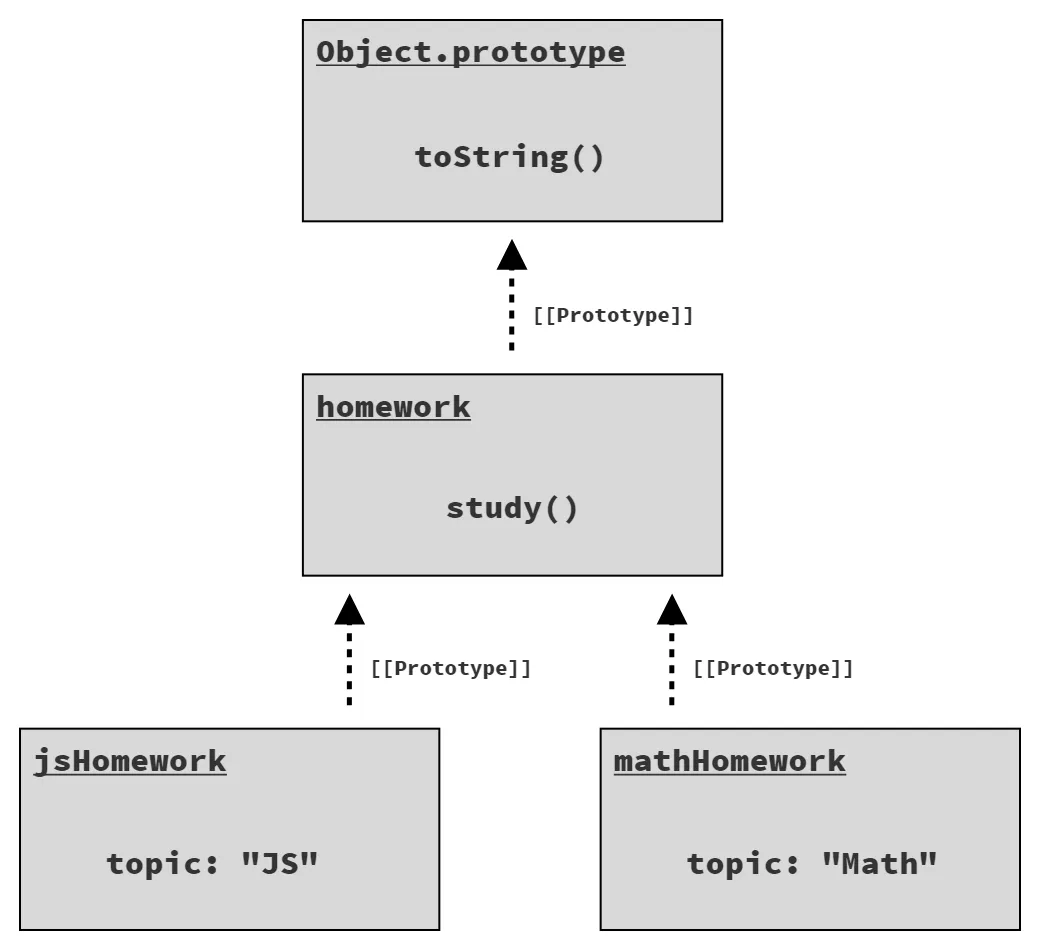
- Prototypes
- A linkage between two objects, occurs when an object is created
- Prototype chain
- A series of objects linked together via prototypes
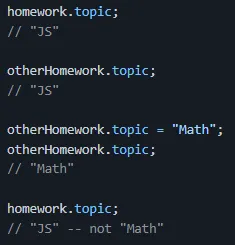
- Allows for accesses for properties/methods that the current object does not have up the prototype chain → delegation
- Characteristic of an object → resolution of a property access
- The default prototype linkage of an object defined with a normal literal
connects to the Object.prototype object, which has common built-in methods
- toString(), valueOf(),…
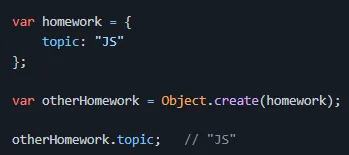
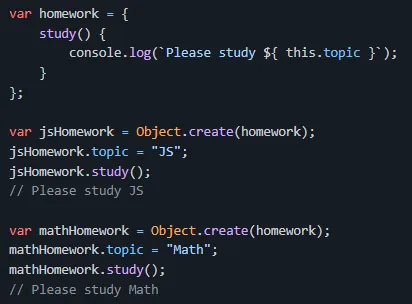
- Object linkage
- Define an object prototype linkage
- Create the object using Object.create(..) utility
- Define an object prototype linkage
- Object.create(null) creates standalone object, preferable some cases
- Can also create object with prototype linkage using prototypal class pattern
- If using constructors (new keyword) to make objects, it’s best to define functions on the prototype of that object
- this revisited
- TypeScript
- Better development-time tooling, static code analysis, compile-time type checking and code-level documentation
- A typed superset of JS → compiles to pure JS, all JS is valid TS
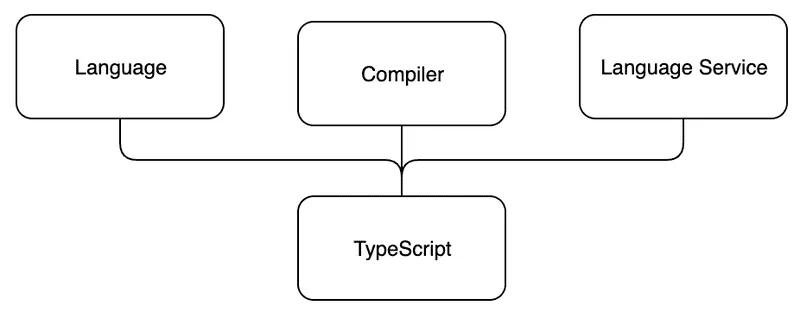
- Language
- Syntax, keywords, and type annotations
- Compiler
- Type information erasure
- Code transformations
- Static code analysis
- Language service
- Collectst type information from the source code
- Devtools can use type info for providing IntelliSense, type hints, and possible refactoring alternatives
- Key features
- Type annotations
- Structural typing
- Type inference
- Type erasure
- Natively supports number, string, boolean, any, object, array, etc…
- npm (node package manager) & webpack
- Historically, libraries can be downloaded and loaded into the head of html
files as .js files (e.g: moment.min.js) from their homepages
- Inconvenient to download new versions of libraries
- JavaScript package managers emerge to automate downloading and updating
libraries from a central repository
- Most famously, npm and yarn (uses npm under the hood)
- npm was originally a package manager for node.js, a JS runtime designed to run on the server, not frontend
- Manage packages with npm
- Navigate to folder containing index.html
- npm init
- This generates a new project config file named package.json
- Install new packages
npm install <package_name> --save(-dev)- Automatically modifies package.json to include new project dependency
- Packages are installed in the node_modules folder
- Downside: have to refer to node_modules folder to find each package
- JS does not have code import/export and no access to client’s file system, have to load each file with variables shared globally
- CommonJS allows for modules and code import/export
- Most well-known implementation of CommonJS modules is node.js
- Load variable with node.js modules directly in JS
var moment = require('moment');- node.js knows location of each npm module and has access to file system
- Browser does not recognise require and cannot access file system → module
bundler
- Module bundler solves this with a build step (which has access to the file system) to create a final browser-compatible output
- Finds all require statements and replace them with the actual content of each required file → a single bundled JS file with no require
- Most popular: webpack
- Webpack
- Install webpack with npm, save to development dependencies
- Run webpack tool in node_modules on the target JS file in development mode (to keep it readable, rather than minified output with production mode)
- Default output is dist/main.js, include this in the HTML
- Automate module bundling with webpack.config.js
- Transpiling code for new language features (babel)
- Convert the code in one language to another similar language
- Browsers are slow to add new features, new languages are created with experimental features that transpile to browser compatible languages
- CSS: Sass, Less, Stylus
- JS: TypeScript, babel, CoffeeScript
- Convert the code in one language to another similar language
- Task runner to automate different parts of the build process
- Frontend tasks include minifying code, optimizing images, running tests, etc.
- Most popular: npm built-in scripts
- Add scripts in package.json file
- npm run test/build/watch
- watch re-run webpack each time any JS file changes
- Development dependency vs. production dependency
- Navigate to folder containing index.html
- Historically, libraries can be downloaded and loaded into the head of html
files as .js files (e.g: moment.min.js) from their homepages
- Webpack
- Static module bundler for modern JS applications
- Builds a dependency graph from one or more entry points and then combines every required module into one or more bundles, which are static assets to serve the content from
- Entry point
- Indicates which module webpack should use to begin building out the dependency graph
- Output
- Where to emit the bundles webpack creates and how to name these files
- If there is a loader or built-in
asset modules support, the
same benefits from bundling JS can be applied to
every file type
- CSS, images, fonts, data, global assets,…
- Best practices: minimize CSS for better load times in production, load data into JS module during build process (d3.js)
- Source maps
- Bundled source code obfuscates errors and warnings from their origins
- If three source files a.js, b.js, and c.js are bundled into bundle.js and one of them contains an error, the stack trace points to bundle.js
- Bundled source code obfuscates errors and warnings from their origins
- OOP principles
- Single responsibility principle
- A class/object/module should only have one responsibility
- For example: DOM update logic should be separate from application logic
- How do you decide to group which set of behaviors together?
- Object role stereotypes
- Roles which commonly occur across OO architectures
- Information holder
- Know certain information and provide that information to other objects.
- Structurer
- Maintains relationships between objects and information about those relationships.
- Service provider
- Performs specific work and offers services to others on demand.
- Controller
- Make decisions and control a complex task.
- Coordinator
- Doesn’t make many decisions but, in a rote or mechanical way, delegates work to other objects.
- Interfacer
- Transforms information or requests between distinct parts of a system.
- Object role stereotypes
- A class/object/module should only have one responsibility
- Loosely coupled objects
- Objects that rely not so heavily on each other that removing or changing one affect another one
- Loosely coupled objects can be easily swapped out for another
- SOLID
- Single Responsibility Principle
- Open/Closed Principle
- Liskov Substitution Principle
- Interface Segregation Principle
- Dependency Inversion Principle
- OOP in JS
- DOM functions should only handle
- Reading and displaying the application state to the user
- Providing an easy-to-use gateway to interact with the methods it needs to
- DOM functions should only handle
- Single responsibility principle
- JS form validation
- Constraint Validation API: validate forms on the frontend with JS
- DOM methods: checkValidity(), setCustomValidity()
- DOM properties: validity, validationMessage, willValidate
- JSON (JavaScript Object Notation)
- Standardized format for structuring data, often encountered working with external servers or APIs
- Exist as strings - useful for transmitting across networks
- Access data by converting into a native JS object or array - “parsing” - same with other languages
- JS has a global JSON object which have convert methods: JSON.parse(), JSON.stringify()
- Use reviver parameter to “revive” any stringified data objects (similar to map)
- Use eval(”(” + JSON.parse(text).function + ”)”) to get back functions
- Avoid including functions in JSON as they will lose their scope and introduce security risks
- Asynchronous code
- Functions that run in the background while the rest of the code executes
- Callbacks: Functions passed into another function as argument
- Chaining them can create callback hells
- When you use callbacks as a response to some event (timer, mouse click, Ajax response, etc.), you introduce asynchrony to the program
- Asynchronous programming allows for non-blocking applications that improve user experience and performance
- Async console
- console.* methods are not JS specs, they are added by the hosting environment
- Some browsers handle console I/O asynchronously because I/O is a very slow and blocking part of many programs
- For debugging, use breakpoints in JS debugger or serializing the object
- Event loop
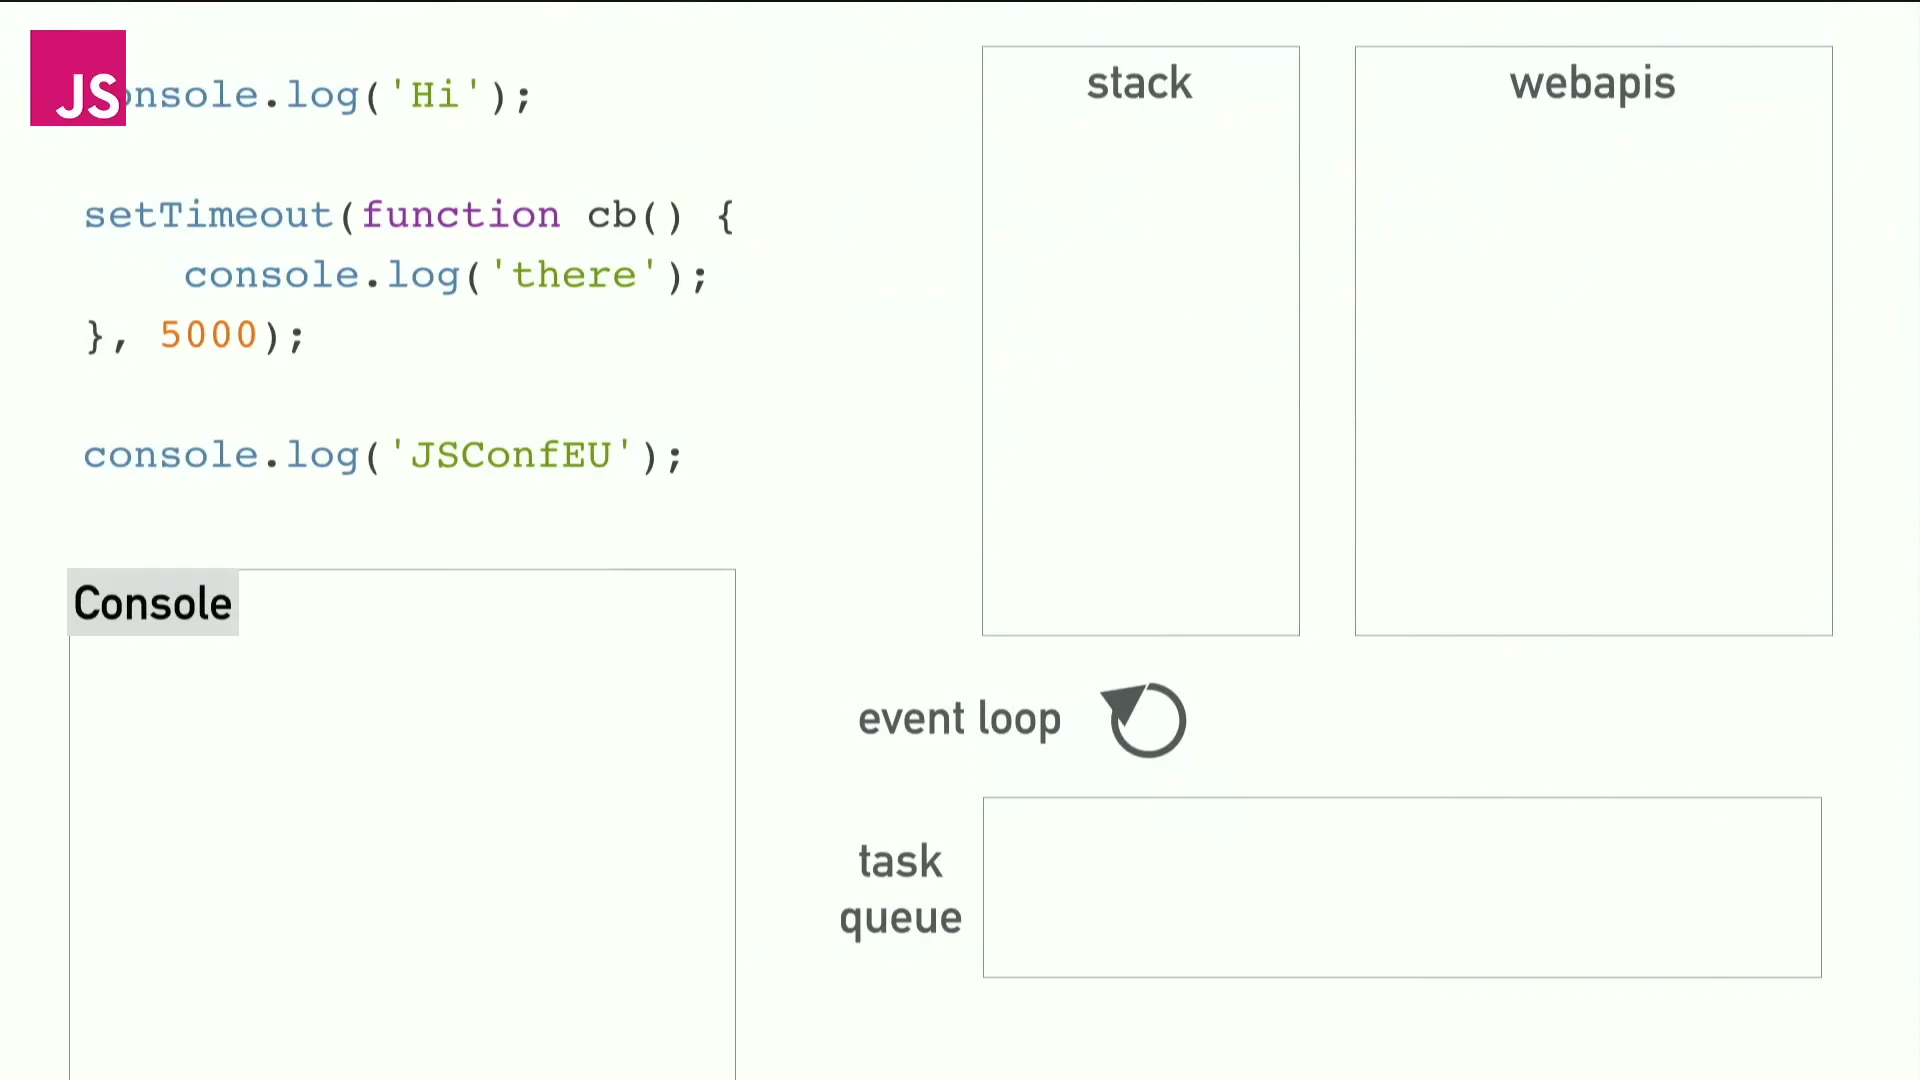
- JavaScript is a single-threaded language that can only execute one task at a time
- The JS engine runs inside a hosting environment, mostly a browser
- Browsers have Web APIs for handling concurrency
- The event loop is a core part of the JavaScript runtime environment.
- The event loop continuously checks the event queue for new events and executes their associated callback functions when the call stack is empty.
- This enables JavaScript to handle events and perform other tasks in an asynchronous way without blocking the main thread.
- Web APIs such as setTimeout() and XMLHttpRequest() allow JS to delegate time-consuming tasks to the browser
- When Web APIs methods are called, they register an event with the browser, which is added to the event queue when it is triggered.
- When the event is triggered, its associated callback function is added to the event queue, and the event loop executes it when the call stack is empty.
- setTimeout(callbackFn, 0) → defer calling callbackFn() until the stack is clear
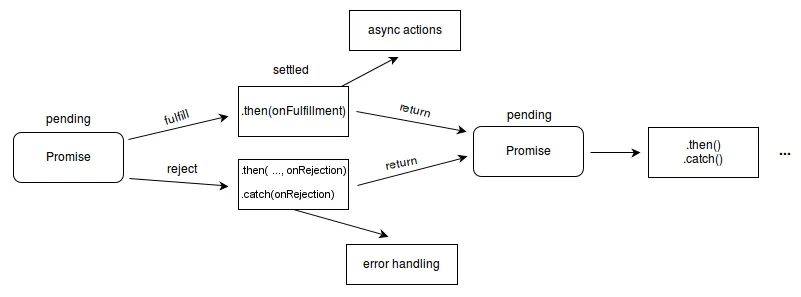
- Promises: an object that might produce a value at some point in the
future - an “I owe you” placeholder for a future value that is exchanged when
the value is ready/ is unavailable/ is indefinitely pending
- Create with
new Promise(executor(resolve, reject) {..})- resolve fulfills promise with passed value
- reject operation failed
- Consume promise values with
.then(resolve(value) {..})or handle rejection with.catch(reject(error) {..}or handle both possibilities with .finally() - All these functions return Promises so they can be chained
- Promise.all([Promise array]) → returns a Promise that is resolved with an array of the results of all parameter Promises
- Promise.race([Promise array]) → returns a Promise that is resolved with
the first value settled
- Create with
- Working with APIs
- Servers created for serving data for external use are called APIs
- APIs are mostly accessed through URLs with specific URL query string parameters
- In most cases, an API key has to be included as an URL query string
parameter with every data request
- Track data usage and abuse, reduce operational costs
- API keys can be leaked through GitHub and internet traffic tracking (URL requests)
- Use the Fetch API to fetch resources asynchronously across the network
- For security reasons, browsers restrict HTTPS requests to certain outside
resources (Ajax requests, etc.) → CORS (Cross Origin Resource Sharing) is
disabled
- Add
{mode: 'cors'}to fetch second parameter after the URL
- Add
- Async and Await
- Help make asynchronous code read more like synchronous code
- async keyword lets JS know the function is asynchronous
- Required to use await inside the function
- The function automatically returns a Promise
- Throwing an error will reject the Promise
- await tells JS to wait for an async action to finish before continuing the
function
- Useful for extracting the actual value instead of just receiving a Promise
- Error handling
- Since async functions return a Promise, append a .catch() method after calling the async function
- Use try/catch block directly inside the async function
- Testing
- Test-driven development - Write tests before writing functional code -
Reduce complexity - Aim for edge cases and code coverage

- Test-driven development - Write tests before writing functional code -
Reduce complexity - Aim for edge cases and code coverage
- Test in isolation
- Test one method at a time
- Avoid tightly coupled functions
- JS test-running systems
- Mocha, Jasmine, Tape, Jest
- React comes bundled with Jest
- Add npm scripts: “test”: “jest”, “watch:test”: “jest —watch *.js”
- npm test
- npm run watch:test
- Jest
- npm install —save-dev jest
- Use it(errorMsg: string, callbackFn: function) or test(errorMsg: string,
callbackFn: function) to test
- callbackFn takes no parameter and has expect(), toBe(), and various other matchers in its body
- Current version of Jest will not recognize ES6 import statements
- Mocking — solution for testing tightly coupled code - Write “fake” versions of a function that always behave exactly how you want
- History of web applications
- Traditional webpage
- All of the logic is on the server, and the browser only renders the HTML as instructed
- Single-page applications (SPAs) fetch only one HTML page fetched from the server, the content of which are manipulated with JS that executes in the browser
- Traditional webpage
- Deeper Git
- History changing Git commands
- Change most recent commit
- Update the staging area to include the missing file
- git add <filename>
- Replace the last commit with our new one to include the missing file
- git commit —amend
- Could also be used to change the message of the last commit
- Only amend commits that have not been pushed anywhere
- Replace the last commit with an entirely new one
- Update the staging area to include the missing file
- Change multiple commit messages
- git rebase -i
- Allows us to interactively stop after each commit we’re trying to modify, and then make whatever changes we wish
- Follow the instructions in the interactive tool
- Reorder commits
- Use git rebase -i
- Squash commits together
- When a feature branch is merged into the main branch, often ends up with visually complex logs of the changes a feature branch
- Use git rebase -i —root to rebase all the way back to root commit
- Melds commits together
- Split up commits
- Change pick to edit for the commit to be splitted in rebase tool
- git reset HEAD^ to resets the commit to the one right before HEAD
- Change most recent commit
- Working with remotes
- git revert HEAD to undo the last commit
- Best practices
- For git amend never amend commits that have been pushed to remote repositories
- For git rebase never rebase a repository that others may work off of
- For git reset never reset commits that have been pushed to remote repositories
- For git push —force only use it when appropriate, use it with caution, and preferably default to using git push —force-with-lease
- Branches are pointers
- History changing Git commands
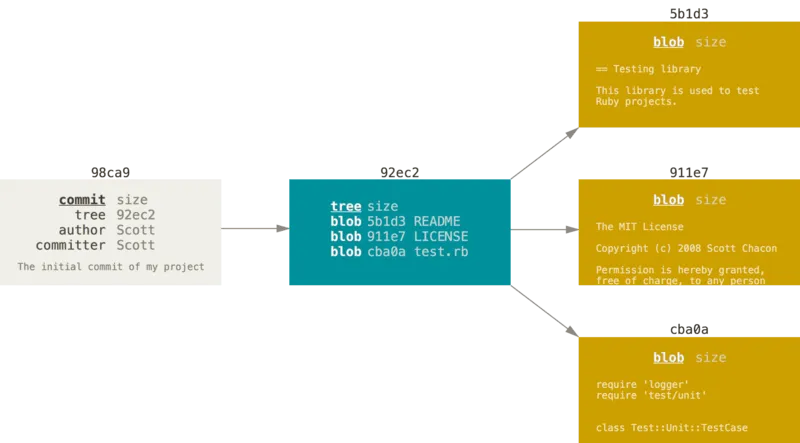
- When a commit is made, Git stores a commit object that contains
- A pointer to the snapshot of the content you staged
- The author’s name and email address
- The commit message
- Pointers to the commit(s) that directly came before this commit
- 0 parents for the initial commit
- 1 parent for a normal commit
- Multiple parents for a commit that results from a merge of two or more branches
- A branch is just a simple, lightweight, moveable pointer to a single commit
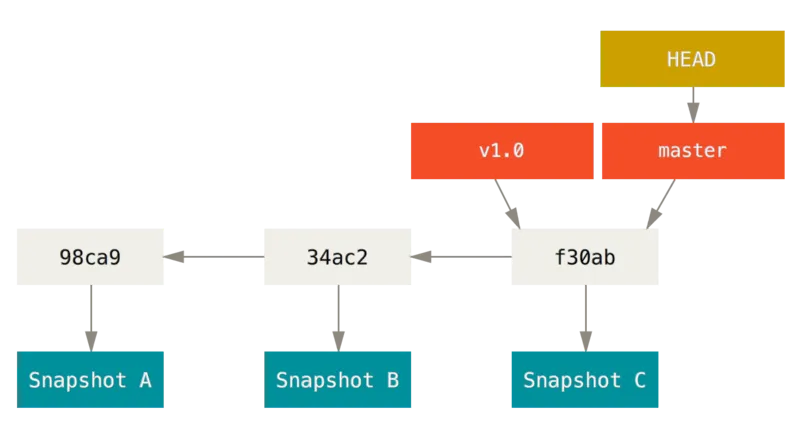
- A commit is also a pointer that points to the commit before it
- HEAD is a special pointer that points to the local branch you’re currently on and moves forward when a commit is made on that branch
- Merge conflicts
- Arises when merging branches that have competing commits
- Branching workflows
- Long-running branches - Have 3 branches - master for production code - develop/next for work or use to test stability - topic, short-lived branches - Branches are at various levels of stability; when they reach a more stable level, they’re merged into the branch above them

- Topic branches
- A topic branch is a short-lived branch that you create and use for a single particular feature or related work
- Merge them in when they’re ready, regardless of the order in which they were created or worked on.

- All these branches are completely local, there is no communication with the server when branching or merging
- Remote branches
- Remote references are references (pointers) in your remote repositories. Another way is remote-tracking branches
- Remote-tracking branches are references to the state of remote branches - They’re local references that you cannot move - Git only moves them whenever you do any network communication - Name format <remote>/<branch>
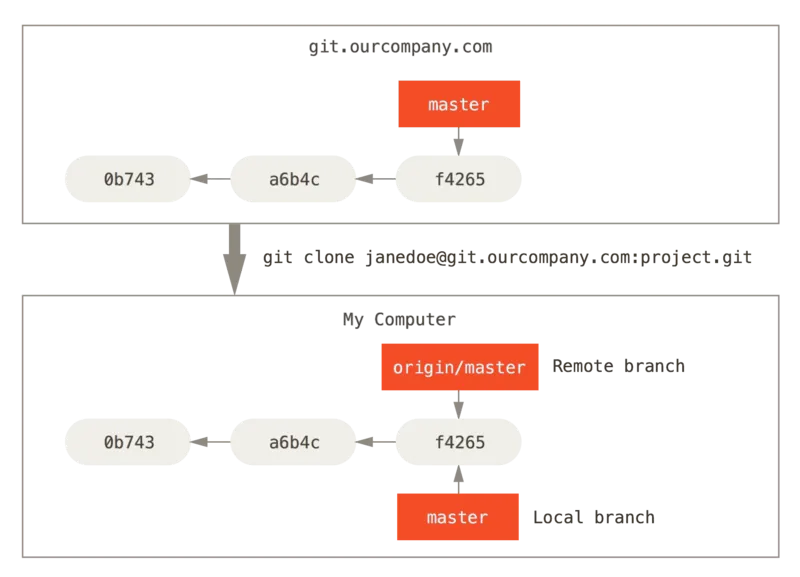
- git fetch updates remote-tracking branches in your local repository
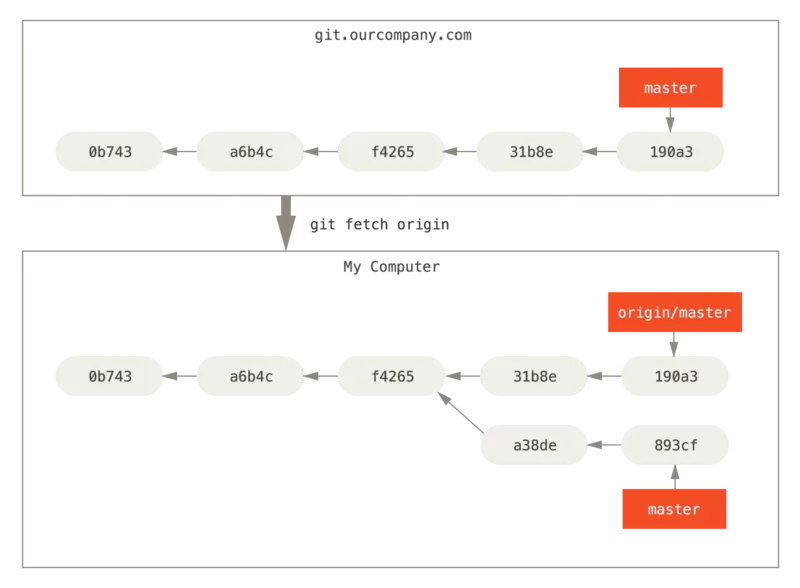
- git push <remote> <branch> to push a branch to a remote to which you have write access
- React
- A JS library for rendering user interfaces (UI)
- React applications are built with reusable components
- In React development, different toolchains (a set of distinct software
development tools linked by specific stages) satisfy different requirements
for product development
- Next.js for SSR web applications
- Gatsby for static, content-oriented websites like blogs or newsletters
- Create React App for SPA and for learning React
- CRA file system - public/manifest.json tells the browser about your Progressive Web App and how it should behave when installed on the user’s desktop or mobile device
- Data flows down from root to to child components as React properties (called props) and flows back up through callback functions
- Libraries to work with React
- react is the core React library
- react-dom provides DOM-specific methods that enable you to use React with the DOM
- React Component
- Each component is defined in an ES6 module
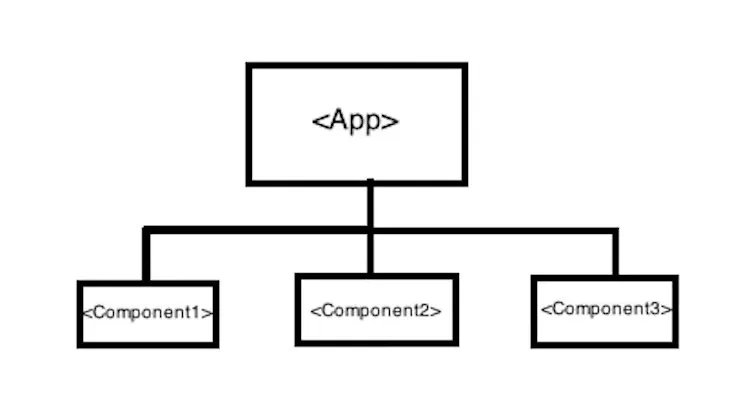
- Write each component in a separate file and import all components into the parent component (App)
- React components have parent and/or child components
- React components should be declared with PascalCase
- JSX is a HTML-like syntax extension that is transpiled (with Babel) into JS so a browser can process
- React is able to combine JS and JSX, have to change HTML attributes due to some JS protected words
- Nest components inside their parents using name of components as JSX tags
- Every React class component needs a render() function, which returns one
top-level JSX element
- render() is React’s most used “lifecycle” function
- Use Fragment pattern/empty <>…</> wrapper to return multiple JSX
elements in render()
- JSX transforms into plain JS objects and you can’t return two objects from a function → Fragment
- JSX attributes become keys of JS objects
- To reuse component, export it and import it in other files
- Two main styles of components
- Class components
- Each component is defined in an ES6 module
import React, { Component } from "react";class App extends Component- Functional component
- Define components as a function (like a factory function)
- Or arrow function syntax
- Or implicit return
- Don’t need to import and extend “Component” from React
- Don’t need a constructor
- Don’t need the render function
import React from "react";function App() { return <div className="App">Hello World!</div>;}- Define every component at top-level, never nest their definitions
- React application begins at a root component, created automatically when starting a new project
- React State and Props
- React components use props to communicate with each other
- Parent component can pass props to its child components
- Pass props to child component

- Read props inside the child component

- React component functions accept a single argument, a props object
- Usually, the whole props object is not needed → Destructure it upon reading properties
- Specify default values for props

- Forwarding props with JSX spread syntax

- Nested JSX like <Card><Avatar /></Card> will appear as Card component’s children prop → oft-used for visual wrappers
- Props are read-only snapshots in time: every render receives a new version of props
- You can’t change props. When you need interactivity, you’ll need to set state
- Patterns for conditional rendering
{cond ? <A /> : <B />}{cond && <A \>}
- Set key prop on each component in a collection so React can keep track of each of them even if their position or data changes
- Keep components pure
- React assumes that every component you write is a pure function
- Changing any objects or variables existed before rendering makes the component impure → avoid
- Treat inputs while rendering (props, state, and context) as read-only, do not mutate inputs
- Strict Mode calls each component’s functions twice during development to
find impure ones
- No effect in production mode, only development
- Wrap root component into <React.StrictMode>
- Side effects usually belong inside event handlers, which don’t need to be pure even though they are defined inside components
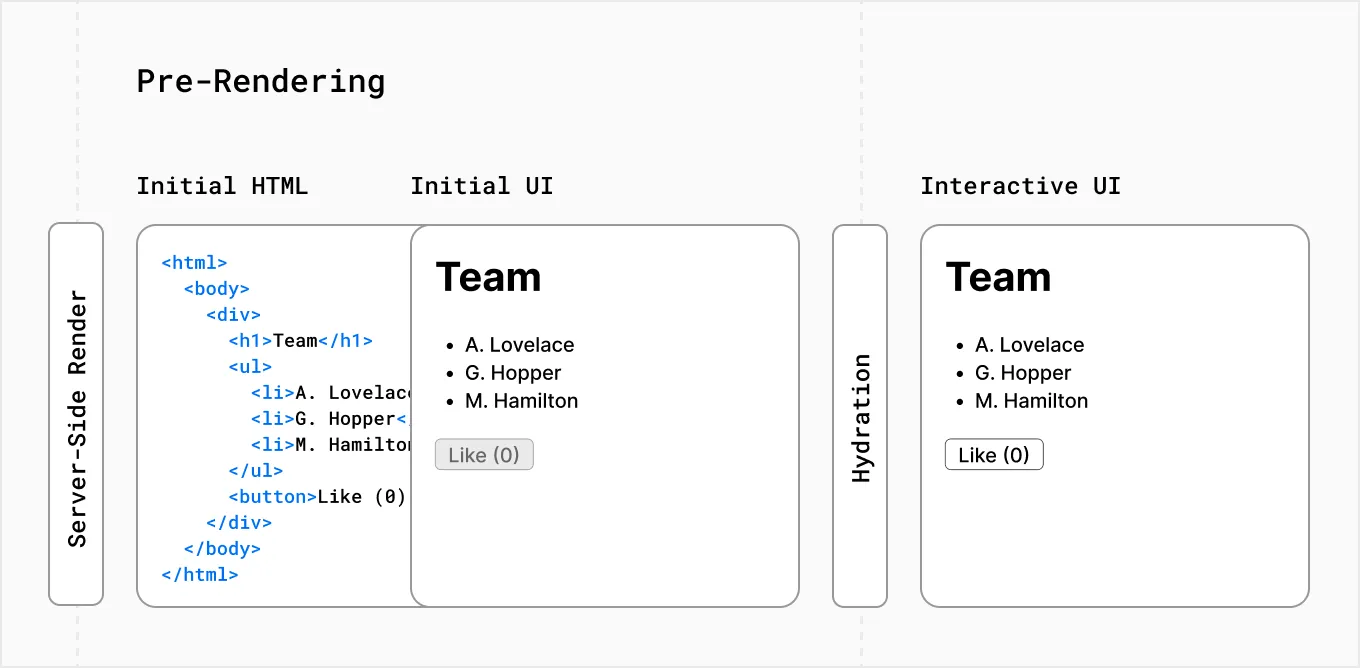
- Benefits - Components could run in a different environment (server) → Server-Side Rendering (SSR) - Components rendered on the server instead of the client. - Pre-renders initial state, improves performance. - Same input produces same HTML output. - Server-rendered components serve multiple requests. - Rehydration on the client enables interactivity (attaching event handlers and managing dynamic behaviors). - Improve performance by skipping rendering components with unchanged inputs
- Adding Interactivity in React
- Data that changes over time is called state
- State can be added to any component, and updated as needed
- Responding to events
- Add a event handler by defining a function and passing it to the JSX tag as a prop
- Event handlers
- Defined inside components
- Have names start with handle
- Common pattern in
design system
- To have components like buttons to contain styling but not specify behavior
- Have higher-level components like PlayButton or UploadButton that will pass event handlers down
- Event handler props’ names should start with on, followed by a capital letter (onSmash)
- Event handlers will catch events from any children of the component → event bubbles up or propagates up
- Use e.stopPropagation() to stop event from bubbling up to parent components
- Explicitly calling an event handler prop from a child handler is a good alternative to propagation (which is just passing the event handler prop as a function to the default browser handler)
- Events may have unwanted default browser behavior. Call e.preventDefault() to prevent that
- State is a component’s memory
- useState Hook provides
- A state variable to retain data between renders
- A state setter function to update the variable and trigger React to re-render the component
- const [index, setIndex] = useState(0);
- index is a state variable and setIndex is the setter function
- The only argument to useState is the initial value of your state variable
- React functions starting with use are called Hooks
- Special functions that are only available while React is rendering
- Lets you hook into different React features
- Can only be called at the top level of your components or
your own Hooks
→ helpful to think about Hooks as unconditional declarations about
your component’s needs
- This enforces a stable call order on every render of the same component
- Use this order to determine which state variable to return
- Managing states
- It’s good to have multiple state variables if their state is unrelated
- If you have many related state variables (form with many fields) → have a state variable that holds an object
- State is isolated and private
- State is local to a component instance on the screen → The same component rendered twice will each have their own isolated state
- If you want state in different components to sync → remove state from child components and add it to their closest shared parent → “lift state up”
- useState Hook provides
- Render and commit
- Requesting and serving UI has three steps
- Triggering a render
- Rendering the component
- Committing to the DOM
- Step 1: Trigger a render
- There are two reasons for a component to render
- Component’s initial render
- Triggered by calling the root’s render() method
- The component’s (or one of its ancestors’) state has been updated
- Trigger further renders by updating state with set function
- Component’s initial render
- There are two reasons for a component to render
- Step 2: React renders the components
- Rendering is React calling your components to figure out what to display
on the screen
- On initial render, React will call the root component (recursive process)
- For subsequent renders, React will call the function component whose state update triggered the render
- Rendering must be a pure calculation
- Same inputs, same output
- Do not change other objects or variables
- Rendering is React calling your components to figure out what to display
on the screen
- Step 3: React commits changes to the DOM
- After rendering the components, React will modify the DOM
- For the initial render, React uses the appendChild() DOM API to put all the created DOM nodes on screen
- For re-renders, React will apply the minimal necessary operations
(calculated while rendering) to make the DOM match the latest
rendering output
- DOM operations are really slow compared to JS operations
- React only modifies the DOM nodes if there’s a difference between renders
- After rendering the components, React will modify the DOM
- After rendering and committing changes to the DOM, the browser will repaint the screen
- Requesting and serving UI has three steps
- State as a Snapshot
- Setting state triggers re-renders
- Rendering takes a snapshot in time
- When React re-renders a component:
- React calls your function again
- Your function returns a new JSX snapshot
- React then updates the screen to match the snapshot you’ve returned
- State does not disappear after the function returns, it lives in React
- When React call your components, it gives the component a snapshot of the state value for that particular render
- The component returns a snapshot of the UI with a fresh set of props, event handlers, and local variables in its JSX, calculated using the state values from that render → state stays the same, never changes within one render, even if its event handler’s code is async → use substitution method
- Every render has its own new set of event handlers
- Setting state only changes it for the next render
- Queueing a Series of State Updates - React processes state updates after event handlers have finished running. This is called batching - To update some state multiple times in one event, you can use setNumber(n => n + 1) updater function - Name update function argument by the first letters of corresponding state variable - State queue - Passing in updater functions to the state setter queues that updater function - During the next render, React goes through the queue and gives you the final updated state setNumber(number + 5); setNumber(n => n + 1); setNumber(42);
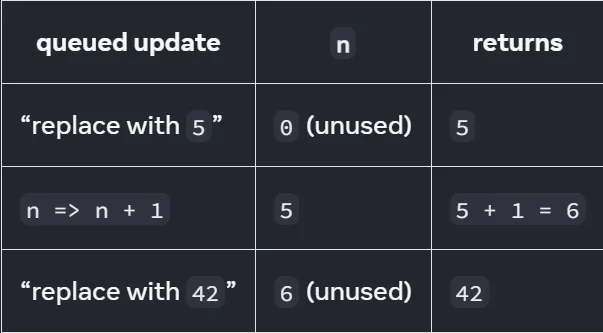
- React stores 42 as the final result and returns it from useState
- Updater functions run during render, must be pure and only return the result
- Updating Objects in State
- Treat all state in React as immutable
- When you store objects in state, mutating them will not trigger renders and will change the state in previous render “snapshots”
- Instead of mutating an object, create a new version of it, and trigger a re-render by setting state to it
- You can use the
{...obj, something: 'newValue'}object spread syntax to create copies of objects - Spread syntax is shallow: it only copies one level deep
- To update a nested object, you need to create copies all the way up from the place you’re updating
- To reduce repetitive copying code, use Immer
- Updating Arrays in State
- You can put arrays into state, but you can’t change them.
- Instead of mutating an array, create a new version of it, and update the state to it.
- You can use the […arr, newItem] array spread syntax to create arrays with new items.
- You can use filter() and map() to create new arrays with filtered or transformed items.
- You can use Immer to keep your code concise.
- Managing State
- React provides a declarative way to manipulate the UI - Describe different states that components can be in, and switch between them in response to the user input - Steps - Identify your component’s different visual states - Can be helpful to display many visual states at once → living styleguides/storybooks - Determine what triggers those state changes - Human inputs - Computer inputs - Visualize state changes with flowcharts

- Represent the state in memory using useState
- Remove any non-essential state variables
- Connect the event handlers to set the state
- Choosing the State Structure
- If two state variables always update together, consider merging them into one
- Choose your state variables carefully to avoid creating “impossible” states
- Structure your state in a way that reduces the chances that you’ll make a mistake updating it
- Avoid redundant and duplicate state so that you don’t need to keep it in sync.
- Don’t put props into state unless you specifically want to prevent updates
- For UI patterns like selection, keep ID or index in state instead of the object itself
- If updating deeply nested state is complicated, try flattening it
- Sharing State Between Components
- Component with local state is called uncontrolled, while components with important information driven by its props rather than local state are called controlled
- When you want to coordinate two components, move their state to their common parent.
- Then pass the information down through props from their common parent.
- Finally, pass the event handlers down so that the children can change the parent’s state.
- It’s useful to consider components as “controlled” (driven by props) or “uncontrolled” (driven by state).
- Preserving and Resetting State
- React makes UI trees from your JSX, React DOM updates the browser DOM elements to match that UI tree
- React keeps state for as long as the same component is rendered at the same position (as in the nth child of xyz parent) in the UI tree with the same structure (no changing JSX tags between renders!)
- State is not kept in JSX tags. It’s associated with the tree position in which you put that JSX
- You can force a subtree to reset its state by giving it a different key
- Don’t nest component definitions, or you’ll reset state by accident
- Effect hooks
- Lets you perform side effects on function components. Data fetching, setting up a subscription, and manually changing the DOM in React components are all examples of side effects
- By default, effects run after every completed render, but you can choose to fire it only when certain values have changed
- The second parameter of useEffect is used to specify how often the effect is run. If the second parameter is an empty array [], then the effect is only run along with the first render of the component
- Thinking in React
- Step 1: Break the UI into a component hierarchy
- Step 2: Build a static version in React (add props to show data)
- Step 3: Find the minimal but complete representation of UI state
- Does it remain unchanged over time? If so, it isn’t state.
- Is it passed in from a parent via props? If so, it isn’t state.
- Can you compute it based on existing state or props in your component? If so, it definitely isn’t state!
- Step 4: Identify where your state should live
- For each piece of state
- Identify every component that renders something based on that state.
- Find their closest common parent component---a component above them all in the hierarchy.
- Decide where the state should live:
- Often, you can put the state directly into their common parent.
- You can also put the state into some component above their common parent.
- If you can’t find a component where it makes sense to own the state, create a new component solely for holding the state and add it somewhere in the hierarchy above the common parent component.
- For each piece of state
- Step 5: Add inverse data flow
- Redux
- Software Development Life Cycle (SDLC)
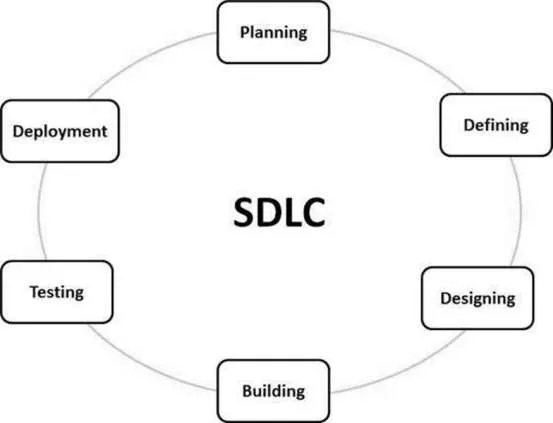
- Stage 1: Planning and Requirement Analysis
- Most important and fundamental stage
- This info is used to plan the basic project approach and conduct product feasibility study
- Stage 2: Defining Requirements
- Clearly define and document the product requirements and get them approved from the customer or the market analysts
- Output an SRS (Software Requirement Specification) document that contains all the product requirements
- Stage 3: Designing the Product Architecture
- Based on the SRS, output more than one design approach for the product architecture in a DDS (Design Document Specification)
- DDS clearly defines all the architectural modules of the product along with its communication and data flow representation with external and third-party modules
- Stage 4: Building or Developing the Product
- Programming code is generated as per DDS
- Stage 5: Testing the Product
- Stage 6: Deployment in the Market and Maintenance
- OAuth 2.0
- Authentication is proving that you are who you say you are
- Authorization is granting an authenticated party permission to access resources of a resource owner
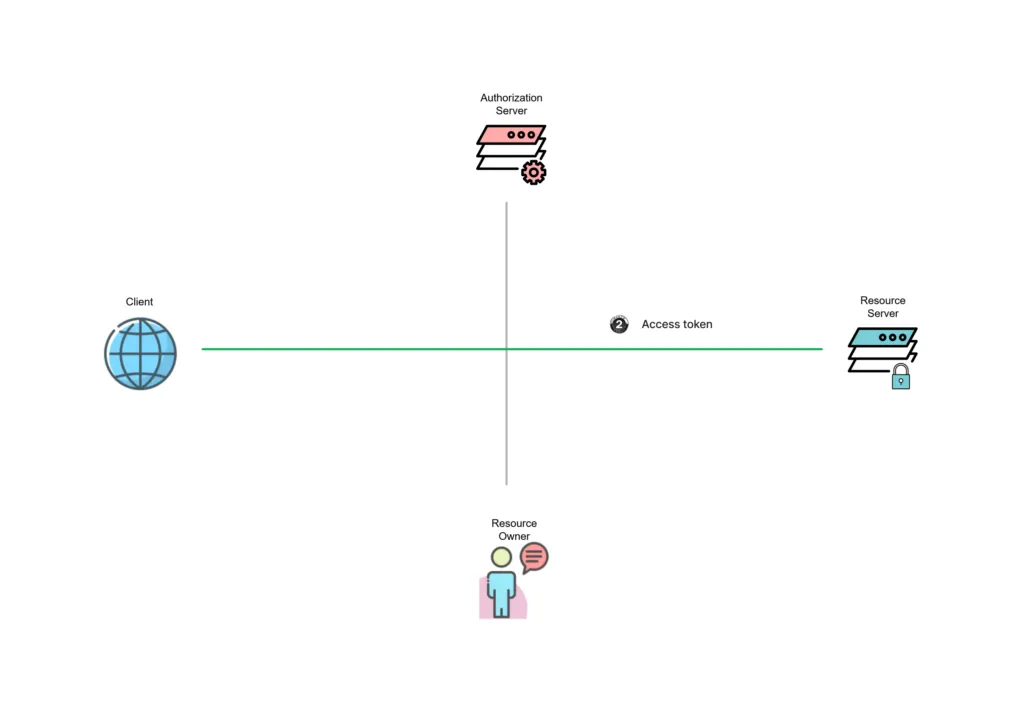
- 4 parties involved in an OAuth 2.0 authentication and authorization exchange
(a.k.a auth flows)
- Resource Owner (User)
- Owns the protected resource that client app accesses on their behalf
- Typically Seller Admin
- Client Application
- Make requests to protected resource stored on the resource server on behalf of the resource owner
- Client application obtains authorization from resource owner
- Also referred to as OAuth client
- Authorization Server (Tiki Marketplace identity platform)
- Tiki identity platform itself is the authorization server
- Securely handles the seller’s information, their access, and the trust relationships between the parties in the auth flow
- Issues the security tokens the client app and APIs use for granting, denying, or revoking access to resources
- Protected Resource (Resource Server)
- Relies on the authorization server to perform authentication nand uses information in bearer tokens issued by the authorization server to grant or deny access to resources
- Resource Owner (User)
- Auth flow
- A flow that exchanges authorization and authentication between parties to grant a client application restricted access to protected resources on a resource server
- All auth flows result in an access token
- Use this to access authorized resources in the Tiki Marketplace
- Tiki Marketplace supports 3 authorization flows
- Authorization code flow
- Client credentials
- Refresh token
- Authorization code flow
- Used to securely acquire access tokens and refresh tokens for client apps by exchanging an authorization code - Authorization code
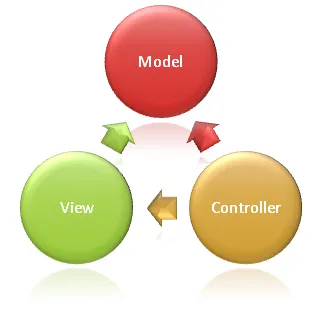
- Model-View-Controller architectural pattern
- Separates an application into 3 main groups of components
- Models
- Views
- Controllers
- User requests are routed to a Controller which is responsible for working with the Model to perform user actions and/or retrieve results of queries
- The Controller chooses the View to display the user, and provides it with any Model data it requires
- Dependencies of each area
- Separates an application into 3 main groups of components
- Model
- Represents the state of the application and any business logic or operations that should be performed by it
- Encapsulates business logic and implementation logic for persisting the state of the application
- View
- Presents content through the user interface
- Minimal logic within views, and any logic in them should relate to presenting content
- Controller
- Handles user interactions, work with the model, and ultimately select a view to render
- The controller is the initial entry point, responsible for selecting which model types to work with and which view to render
- Essentially controls how the app responds to a given request
- Benefits
- Separation of concerns
- Allow Model to be built and tested independently
- Docker
- Containers are an isolated environment to run any code, like a VM (running an OS)
- Images are used to run containers
- Create/build an image using a Dockerfile and a sample application
- docker build -t welcome-to-docker .
- -t flag tags image with a name
- . lets Docker know the location of the Dockerfile
- Once built, an image can be run as a container inside Docker Desktop GUI,
remember to specify the container’s name and port number
- Or use docker run -d -p 8088:3000 —name welcome-to-docker welcome-to-docker
- This will search the requested image is available locally, if there’s none, it pulls the latest image with that name from the configured container registry (Docker Hub)
- Open
http://localhost:8088\in your browser
- An image can run many containers
- View the frontend at the exposed port of the container
- Use Docker to run other people’s images uploaded on Docker Hub
- When running an image from a container registry like Docker Hub, Docker checks if the image is already on your local machine. If it’s not found locally, Docker automatically pulls the image from the registry to your local machine before running it as a container
- Publish your local image
- Rename you image with docker tag IMAGE-NAME YOUR-USERNAME/IMAGE-NAME
- It associates a new name/tag with the existing image.
- Multiple tags can refer to the exact same image and share the same underlying image data
- Image data will still be retained as long as there is at least one remaining tag pointing to it
- docker push [OPTIONS] NAME[:TAG]
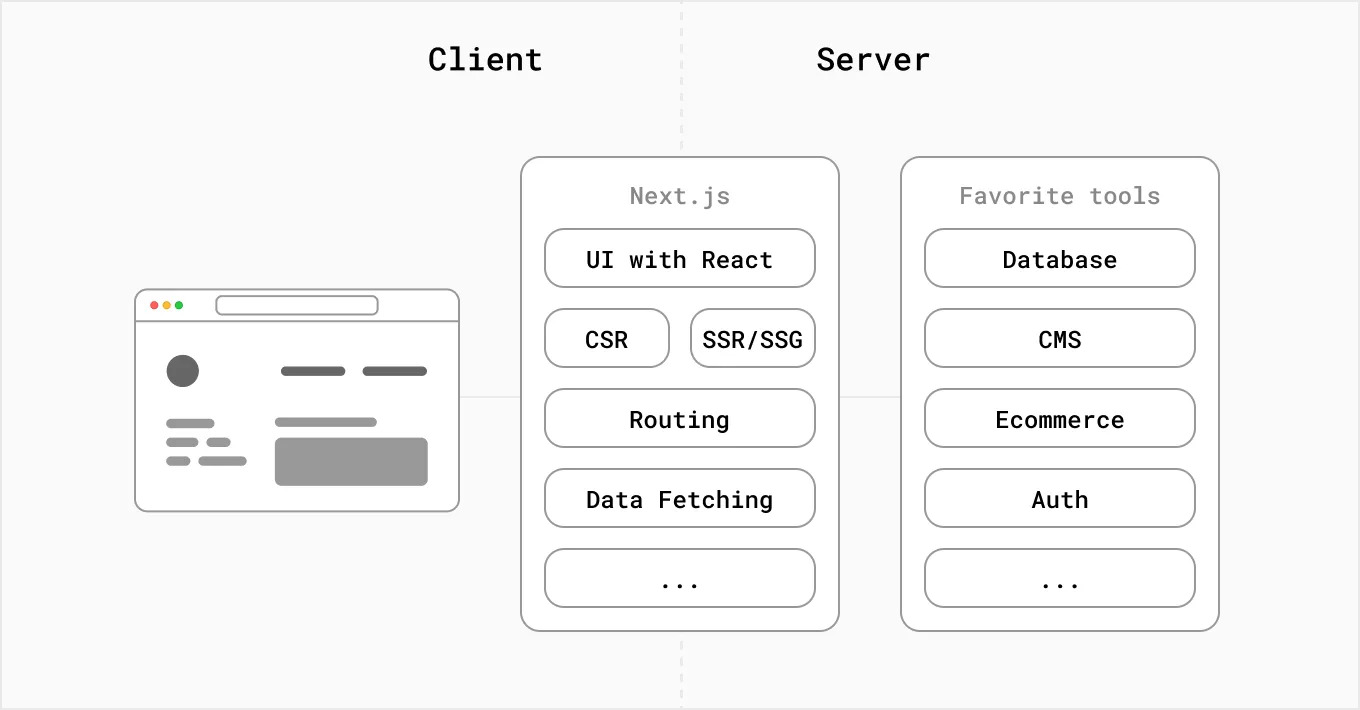
- Next.js
- React framework for building web applications
- Build UI using React components and Next.js provides additional structure, features, and optimizations for your application
- Abstracts and automatically configures tooling (bundling, compiling, and more)
- Building block of a modern web app - User Interface - how users will consume and interact with your application. - Routing - how users navigate between different parts of your application. - Data Fetching - where your data lives and how to get it. - Rendering - when and where you render static or dynamic content. - Integrations - what third-party services you use (CMS, auth, payments, etc) and how you connect to them. - Infrastructure - where you deploy, store, and run your application code (Serverless, CDN, Edge, etc). - Performance - how to optimize your application for end-users. - Scalability - how your application adapts as your team, data, and traffic grow. - Developer Experience - your team’s experience building and maintaining your application.
- Build UI with React → Incrementally adopt Next.js features to solve common app requirements (routing, data fetching, integrations)
- How Next.js works
- The environment where your code runs: Dev vs Prod
- During development, you’re building and running the app on your local
machine
- Optimizes for DX
- TypeScript
- ESLint
- Fast Refresh
- …
- Optimizes for DX
- Going to your production is making your application ready to be deployed
and consumed by users
- Optimizes for UX
- Transform code to be performant and accessible
- Moving an app from dev to prod requires
- Compilation
- Happens during dev as code is modified
- Part of the build step for prod
- Bundling
- Resolves code dependencies and merge files into optimized bundles
- Reduces the number of requests for files end users have to make
- Minifying
- Removes unnecessary code formatting and comments
- Next.js minifies JS and CSS files for prod
- Code splitting
- Each page that can access a multi-page application (from different URLs) is a unique entry point
- Splits the app’s bundle into smaller chunks required by each entry point
- Improve app’s initial load time by only loading the code required to run that page
- Compilation
- Optimizes for UX
- Next.js handles much of these code transformations with its compiler, written in Rust and SWC
- During development, you’re building and running the app on your local
machine
- When your code runs: Build time vs Runtime
- Build time is a series of steps that prepare app code for production
- HTML files for statically generated pages
- JS code for rendering pages on the server
- JS code for making pages interactive on the client
- CSS files
- Runtime (or request time) is when the app runs in response to a user’s request, after the app has been built and deployed
- Build time is a series of steps that prepare app code for production
- Where rendering happens: Client vs Server - Rendering is converting written React code into HTML representation of the UI - Three types of rendering methods - Server-Side Rendering - Static Site Generation - Client-Side Rendering - Pre-Rendering - SSR and SSG are also called Pre-Rendering because they fetch external data and transform React components into HTML before the result is sent to the client
- The environment where your code runs: Dev vs Prod
- CSR
- Browser receives empty HTML shell along with JS instructions to construct the UI from the server - React standard method
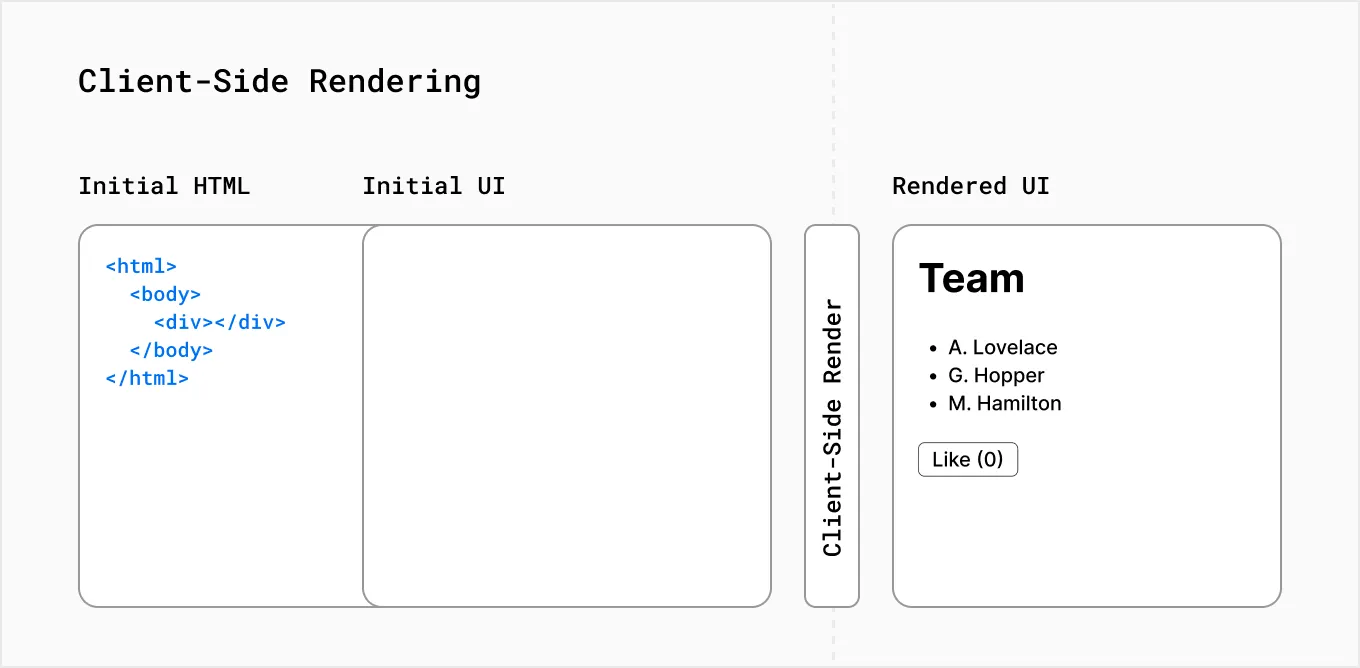
- Opt to use CSR for specific components in Next.js app by choosing to fetch data with React’s useEffect() hook or a data fetching hook like useSWR
- SSR
- HTML is generated on server for each request
- The generated HTML, JSON data, and JS instructions to make the page
interactive are then sent to the client
- Process called re-hydration
- Opt to SSR pages in Next.js by using getServerSideProps
- SSG
- HTML is generated once at build time when the app is deployed to a CDN and re-used for each request
- Opt to statically generate pages by using getStaticProps
- Application code can be distributed to
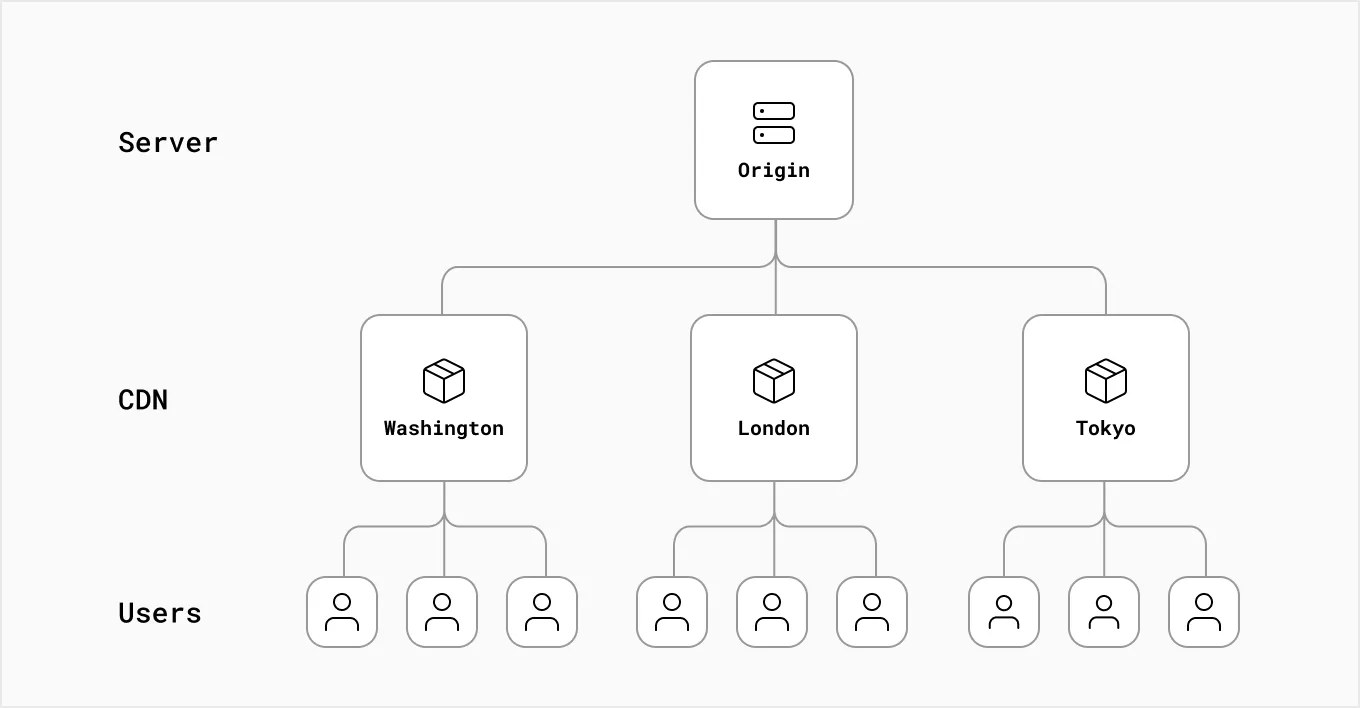
- Origin servers
- The main computer that stores and runs the original version of the app code
- Does some computation before sending a response when receives a request
- The result of the computation work can be moved to a CDN
- Content Delivery Networks (CDNs)
- Store static content (HTML, image, video files, etc.) in multiple locations around the world and are placed between the client and the origin server
- Closest CDN location to the user respond with cached result when a newe request comes in
- Reduces load on origin because no computation
- Faster for users for geographic distance
- The Edge
- Refers to the edge of the network, closest to the user
- CDNs can be part of the Edge
- Similar to CDNs, store static content
- Some Edge servers can run small snippets of code
- Caching and code execution can be done at the Edge closer to the user
- Refers to the edge of the network, closest to the user
- Next.js Project Structure
- In Next.js, a page is a React Component exported from a file in the pages
directory
- Pages are associated with a route based on their file name
- In development
- pages/index.js is associated with the / route
- pages/posts/first-post.js is associated with the /posts/first-post route
- Use Link component in next/link to link between pages in application →
client-side navigation and accepts props → faster than browser default
navigation
- If use a HTML tag → browser does a full refresh
- In prod build, Link component will prefetch the linked page in the background → near-instant page transition
- In Next.js, a page is a React Component exported from a file in the pages
directory