Docker
- Docker
- Open platform for developing, shipping, and running applications
- Separates applications from infrastructure
- Docker platform
- Package and run an application in a loosely isolated environment called a container
- Isolation and security let you run many containers simultaneously on a given host
- Containers are lightweight and contain everything needed to run the application, so you don’t need to rely on what’s installed on the host
- Lifecycle of containers
- Develop your application and its support components using containers
- The container becomes the unit for distributing and testing your application
- Deploy the app into production as a container or an orchestrated service
- Use cases - Fast, consistent delivery of your applications - Streamlines the development lifecycle by allowing developers to work in standardized environments using local containers which provide your applications and services - Containers are great for CI/CD workflows - Responsive deployment and scaling - Running more workloads on the same hardware
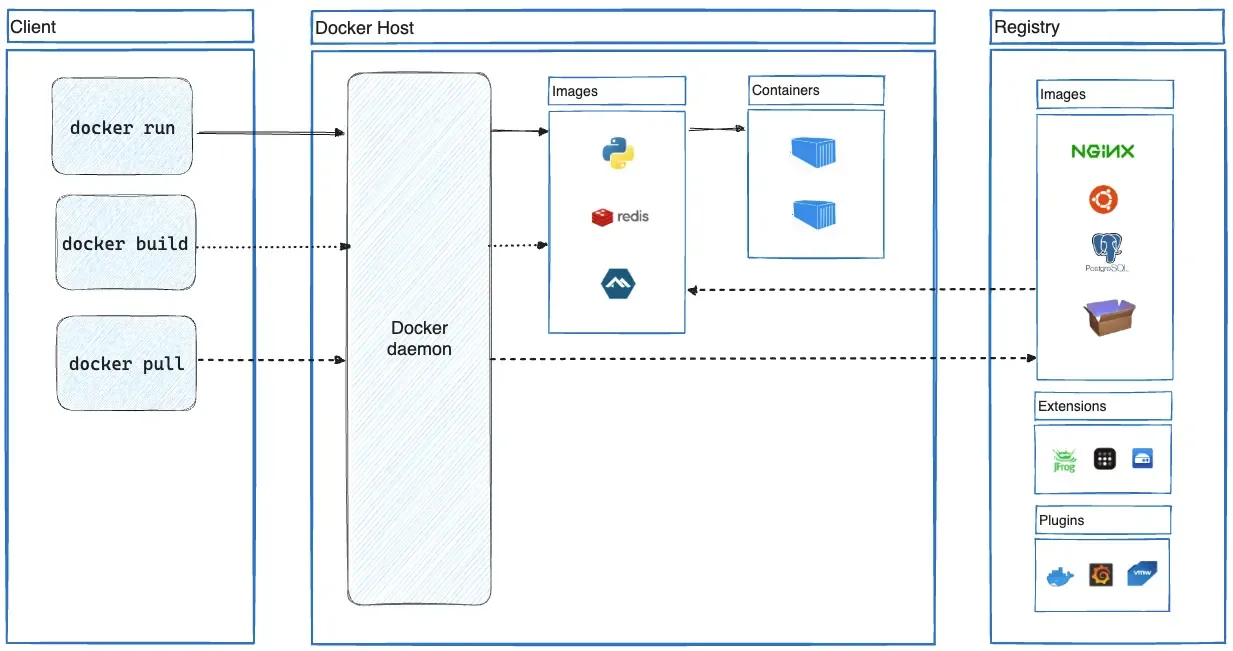
- Architecture
- Uses a client-server architecture
- Docker client (
docker)- The primary way that many Docker users interact with Docker
- Users type
docker run, client sends commands todockerd, which executes them dockercommand uses the Docker API- Can communicate with more than one daemon
- Talks to the Docker daemon through a REST API, over UNIX sockets, or a network interface
- Another Docker client is Docker Compose, which lets you work with applications consisting of a set of containers
- Docker daemon (
dockerd)- Build, run, and distribute Docker containers
- Listens for Docker API requests and manages Docker objects (images, containers, networks, and volumes)
- A daemon can also communicate with other daemons to manage Docker services
- The Docker client and daemon can run on the same system, or the Docker client can connect to a remote Docker daemon
- Docker registries (Docker Hub)
- Stores Docker images
docker pullanddocker push
- Docker objects
- Images
- Read-only templates with instructions for creating a Docker container
- An image is often based on another image, with some additional customization
- Create your images or use those created by others and published in a registry
- A Dockerfile defines the steps/instructions needed to create an image and run it
- Each instruction creates a layer in the image
- When a Dockerfile is changed and the image is rebuilt, only those layers which have changed are rebuilt
- Containers
- A runnable instance of an image
- Create, start, stop, move, or delete a container using the Docker API or CLI
- Connect a container to one or more networks, attach storage to it, or even create a new image based on its current state
- Well isolated from other containers and its host machine
- Control how isolated a container’s network, storage, or other underlying subsystems are from other containers or the host machine
- A container is defined by its image as well as any configuration options you provide to it when you create or start it
- When a container is removed, any changes to its state that aren’t stored in a persistent store disappear
- Networks
- Volumes
- Plugins
- Images
- Docker Desktop
- Enables building and sharing containerized applications and microservices
- Includes the Docker daemon (
dockerd), the Docker client (docker), Docker Compose, Docker Content Trust, Kubernetes, and Credential Helper
- Workflows
- Build an image with a Dockerfile
- The
docker buildcommand builds Docker images from a Dockerfile and a “context” - The build context directory
- The directory on the host machine where Docker will get the files to build the image
- Passed to
docker build - Dockerfile can be located elsewhere from the build context
- The
WORKDIRdirectory- The directory inside your container image that can be set with the
WORKDIRinstruction in the Dockerfile - Setting it to
/appis good practice - Subsequent instructions in the Dockerfile will operate in this dir, such
as
RUN,CMD, andENTRYPOINT - For
COPYandADD, they have<src>and<dest><src>is relative to the build context directory<dest>is relative to theWORKDIRdirectory
- The directory inside your container image that can be set with the
- Best practices
- Image layering
- Dockerfile contains commands that create layers within an image
- Use
docker image historyto see the command that was used to create each layer within an image
- Layer caching
- Once a layer changes, all downstream layers have to be recreated
- Multi-stage builds
- Use multiple stages to create an image
- Benefits
- Separate build-time dependencies from runtime dependencies
- Reduce overall image size by shipping only what your app needs to run
- Use .dockerignore to specify files and directories that Docker should ignore when building an image
- Decouple applications to scale horizontally and reuse containers
- Each container should contain one process, but not a hard and fast rule
- Tag built images with useful tags which codify version information
(
prod,test, etc.) - Avoid storing application data in the container’s writable layer. Use volumes instead
- Use secrets for sensitive application data and use configs for non-sensitive data
- When you check in a change to source control or create a PR, use CI/CD pipeline to automatically build and tag a Docker image and test it
- [Best practices for Dockerfile instructions | Docker Docs]](https://docs.docker.com/develop/develop-images/instructions/)
- Image layering
- The
- Run containers from an image with
docker run/Docker Desktop - Run multi-container applications with Docker Compose
- Use Docker Compose Watch to automatically update and preview running services as you edit and save your code
- Map ports with
HOST:CONTAINER, whereHOSTis the address on the host, andCONTAINERis the port on the container - In general, each container should do one thing and do it well
- There’s a good chance you’d have to scale APIs and front-ends differently than databases.
- Separate containers let you version and update versions in isolation.
- While you may use a container for the database locally, you may want to use a managed service for the database in production. You don’t want to ship your database engine with your app then.
- Running multiple processes will require a process manager (the container only starts one process), which adds complexity to container startup/shutdown.
- Allow containers (which run in isolation and don’t know anything about other processes or containers on the same machine) to talk to another by placing them on the same network
- Services in the same network can refer to another using a network alias instead of having to find out their IP address (service discovery using DNS) → the name defined in Compose file is the network alias
- Env vars for development is okay, but highly discouraged in production, use the secret support provided by your container orchestration framework instead
- Docker Compose automatically creates a network specifically for the application stack
- Two main types of volumes: (named) volume mounts and bind mounts
- Persist container data with volume mounts
- Because Docker isolates all content, code, and data in a container from your local filesystem, when a container is deleted, Docker deletes all the content within the container
- Persist data that a container creates with volumes
- Volume is a location in your local filesystem, automatically managed by Docker Desktop
- Build an image with a Dockerfile
compose.yaml
todo-database:
volumes:
- database:/data/db
volumes:
database:
volumesundertodo-databasetells Compose to mount the volume nameddatabaseto/data/dbin the container of thetodo-databaseservice- Top-level
volumeselement defines and configures a volume nameddatabasethat can be used by any of the services in the Compose file - Use this method to persist data over bind mounts
- Access a local folder from a container with bind mounts
- By default, containers can’t access directories in your local filesystem
todo-app
volumes:
- ./app:/usr/src/app
- /usr/src/app/node_modules
- By default, containers can’t access directories in your local filesystem
- Mount the local folder
./appto/usr/src/app(WORKDIR) in the container fortodo-appservice. This bind mount overwrites the static contents of the/usr/src/appdirectory in the container and creates a development container- The container sees the changes you make to the code immediately, as soon as you save a file
- The second instruction,
usr/src/app/node_modules, prevents the bind mount from overwriting the container’snode_modulesdirectory to preserve the packages installed in the container - Use Docker Compose Watch over this, it has hot reload
- Containerize your application with
Dockerfile(to define your image) andcompose.yaml(to define how to run the image) withdocker init(configure your project with sensible defaults - Publish your image to a container registry
- Create your image
- Rename your image with
docker tag
- Run containers in production with container orchestration using Kubernetes
- Benefits
- Automate the maintenance of applications
- Enable the replacement of failed containers automatically
- Manage the roll-out of updates and reconfigurations of those containers during their lifecycle
- Orchestrators are tools to manage, scale, and maintain containerized applications → Kubernetes/Docker Swarm/…
- All containers in Kubernetes are scheduled as pods, groups of co-located containers that share some resources
- In a realistic application, you almost never create individual pods
- Most workloads are scheduled as deployments, which are scalable groups of pods maintained automatically by Kubernetes
- All Kubernetes objects should be described in Kubernetes YAML files
- Describe all components and configurations of your Kubernetes app, and can be used to create and destroy your app in any Kubernetes environment
- Pattern in Kubernetes YAML file
apiVersion: the Kubernetes API that parses this objectkind: indicates what sort of object this ismetadata: apply things like names to your objectsspec: specifies all the parameters and configurations of your object
- Create a pod with
.yaml - Run
kubectl apply -f <filename>.yamlto create the pod - Check pods with
kubectl get pods - Get logs with
kubectl logs <podname> - Tear down pods with
kubectl delete -f pod.yaml
- Benefits
- Observability
- Let us understand a system from the outside by letting us ask questions about that system without knowing its inner workings
- Troubleshoot and handle novel problems
- The application code must emit signals such as traces, metrics, and logs
- Telemetry refers to data emitted from a system, about its behavior. The data can come in the form of traces, metrics, and logs
- Reliability: Work correctly even in the face of adversity
- Metrics are aggregations over a period of time of numeric data about your infrastructure or application
- SLI, or Service Level Indicator, represents a measurement of a service’s behavior
- SLO, or Service Level Objective, is the means by which reliability is communicated to an organization/other teams. This is accomplished by attaching one or more SLIs to business value
- A log is a timestamped message emitted by services or other components
- Logs aren’t extremely useful for tracking code execution, as they typically lack contextual information
- Become far more useful when they are included as part of a span, or when they are correlated with a trace and a span.
- A span represents a unit of work or operation. It tracks specific
operations that a request makes, painting a picture of what happened during
the time in which that operation was executed
- Contains name, time-related data, structured log messages, and other metadata
- A distributed trace, more commonly known as a trace, records the paths taken by requests (made by an application or end-user) as they propagate through multi-service architectures, like microservice and serverless applications
- OpenTelemetry
- Vendor-neutral open source observability framework for instrumenting, generating, collecting, and exporting telemetry data
- I first needed to understand what to use: k8s, minikube, k3s, k3d, kind, Microk8s, Firekube etc (when you understand how kubernetes works and what it does things are not complex, but when you just want to run some containers and do not know anything about Kubernetes this can be a pain).
- I had to understand what a selector is and how it works, differences between Pods vs Replica Sets vs Stateful Sets vs Deployments, NodePorts vs ClusterIp vs LoadBalancer vs Headless (again fairly basic concepts when you have a good understanding of kubernetes, but can be a pain when you have 0 kubernetes experience and you just want to run some containers that can communicate with eachother.
- wait why doesn’t kubernetes see my local image. Oh I have to create a registry? How does a registry work, what options do I have ?
- I see there is this thing called Helm I need in order to install “some containers”. Oh I need to learn Go template language.
- I’ve used helm to install this database that I am using, but it has multiple instances running I want just one because my PC cannot handle the extra weight. Hmmm I see I installed an operator. What is an operator, how do I use it, how do I modify it.
- https://www.reddit.com/r/sveltejs/comments/12vx3tt/sveltekit_node_adapter_dockerfile_review/
- Looking through the Dockerfile (on my laptop this time) I see one thing that I would change in your case: Do not copy your .env file to the container. .env files should contain environment specific configuration, and should generally not be part of the container.
- .env should be in your .dockerignore file.
- If you need environment values during build time (static variables in Sveltekit), you should reference them in the build command, e.g.:
- docker build —build-arg ENV_VAR_1=value1 —build-arg ENV_VAR_2=value2 -t myimage:latest .
- Or referencing the .env file directly like this:
- docker build —env-file /path/to/.env -t myimage:latest .
- If you need variables during runtime (Dynamic variables), you can achieve the same thing like this:
- docker run -e ENV_VAR_1=value1 -e ENV_VAR_2=value2 myimage:latest
- Or referencing the file:
- docker run —env-file /path/to/.env myimage:latest
- For portability and security reasons you want to use dynamic variables (runtime env vars) wherever you can. That way you can build your container without any secrets of env specific information. Instead, you can run the same container on dev, test, prod, etc. by just setting some environment variables on the running containers. You also avoid your secrets leaking out if you publish your container publicly.
- Yeah, knowing the basics of how to create and run docker containers is definitely a must nowadays.
- For rolling out to production it’s generally a lot nicer to have a container image already built. That way you can easily scale, update, rollback, etc. So the usual flow (for me at least) is:
- Make some code adjustments, commit to GitHub
- A workflow is triggered that builds the container image and uploads it to docker hub (or a different container hosting thing). The new image will have the tag of either the git tag of the commit sha (the latter is easier)
- Either automatically or manually update the production image to the latest tag.
- Step 1 is pretty straight forward I guess.
- Step 2 can be done either with a Github Action (which is just a .yaml file in your repo, e.g. /.github/workflows/build-my-thing.yaml); or you can trigger it from Docker Hub (but this is not my preference). Here’s an example of a docker build github action that I use.
- Step 3 depends on your production environment. In the past I’ve had similar setups to you, and I would just create a Github Action that uses SSH to update an environment variable that contains the tag and restart the services. Basically this portion of the docs.
- If you want to get a bit more scalable you can consider using some container hosting service (Like Digital Ocean Apps), or deploying it to a k8s cluster or a Docker Swarm.
Yeah, I know. It’s a lot. But they all have their own reason to be. Let me see if I can clear some things up. The Dockerfile is just declaring how 1 single container image should be built. The docker build command can be used to build that image. That image could then be pushed to a container repo (like Docker Hub).
The docker run is used to run 1 single container. You can specify a million things in the command, like env variables, network flags, ports, etc. These commands will get long and cumbersome. Especially when you have multiple containers that need to interact with each other, this becomes unmanageable pretty quickly.
docker compose is a development tool that makes dealing with multiple docker containers easier. This tool is completely optional, as everything you can do with docker compose, you could also do with a lot of separate docker commands. It’s just a lot easier. Rather than running a bunch of commands to setup networks and volumes and run a few containers, you just create one yaml file that describes the environment you want, and then go docker compose up.
docker compose doesn’t ‘configure’ your Dockerfile as much as it just is an easy alternative to running docker build and docker run commands. You’d have to pass those settings along somehow. Might as well do it in a nice config file.
Ideally docker compose should not be used to build any container images in a GitHub Action or any other workflow. It is also should not be used on production. At least you’d want to use docker stack for that, which effectively is the ‘go’ version of compose that allows you to do a few more cool things.
The GitHub Action workflow is also completely optional. It’s just an easy way to automate building, pushing and deploying your docker images. You could do all of that locally on your own system, but again it’s just convenience. When I make a change, and push it to GitHub, it will test, build, push and deploy it to prod without me having to worry about it. It’s just automation.
Disclaimer: I’ve never used stack or swarm, as my go-to is prod environment is kubernetes. So I can’t give you much good info on that unfortunately.
- Martian Kubernetes Kit: a smooth-sailing toolkit from our SRE team
- Martian Kubernetes Kit: unboxing our toolkit’s technical secrets
- Kamal
- Build images on GitHub Actions with Docker layer caching
- Supercharging Docker Compose setup
- Use profiles to start containers only when needed
- Use a Makefile for common tasks